I've recently been faced with a dilemma. With all the jewelry I make on a regular basis and buy (unfortunately) on a regular basis....where do I store it all? And better yet, how do I keep it from looking like a big pile of metal?
Can you say DIY.....
Well let me rewind here since I actually found a solution to this dilemma quite some time ago. While browsing Etsy (as I am doing simultaneously while writing this blog), I came across the jewelry holder pictured above by the sellers W.Ho Made It. The amazing sister duo behind the shop had quite a few of lovely and decorative jewelry stands available but the price was a tad steep for me. I told myself I should just go ahead and make my own but months passed and not one attempt was made.
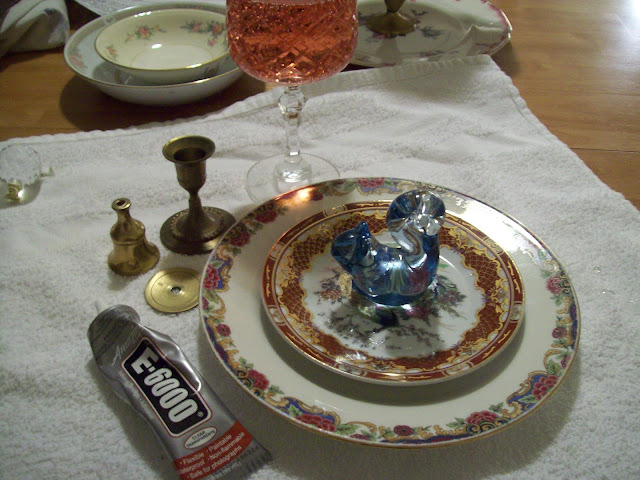
However this past weekend presented itself as the perfect time to go ahead and try it. Not sure how the original minds behind this DIY made theirs, I (for the sake of time, money and lack of ability to properly use a drill without damaging the piece in question) I opted to use flat based separators for between the different tiers and a crafters life saver....E6000.
After visiting every Goodwill and Savers on Rt 1 for cheap but pretty china, I finally arrived at my parents and was able to begin. I decided on vintage taper candle holders as my tier separators. It went well with the vintage them and I thought it would add a bit more character to the tray.
I didn't want the space between each tier to be even so I took apart one of the candle holders by unscrewing the actual holder from its base, sawing off the part the stuck out (well actually my dad did with a hand saw as he was almost certain I would either hurt myself or his furniture) and then painstakingly sanding down the top of what was left so that the plate could sit a top it.
Yes...a glass of wine/mixed drink is a must when doing a DIY (probably another reason why my dad opted to do the sawing)
With all the pieces ready I began to assemble the tray. The great thing with this glue is that it doesn't set immediately. Once I laid down my first candle holder on the bottom plate, I was able to adjust it to make sure it was completely center. I also used large thin washers (about 1in in diameter) as spacers between the candle holder and the plate for a little more of a base. I then put the finished pieces on a flat surface in a safe place to let the glue set and....


17 comments:
Amazing!! I think you're very creative.. Good Job! :D
pretty victorian items. i love them!
great idea!
visit me and we can follow each other, if you want! :)
xx
lesimple.sk
Lovely!
Would you mind following my blog?
www.fashionablydrugged.blogspot.com
Oh my goodness! You made that?!?! Thats so chic and amazing. Kudos.
amazing pic!!
I love this idea. I am going to have to try it out!
very pretty <3
Visit…follow...
http://funkyfraiche.blogspot.com/
http://funkyfraiche.blogspot.com/
http://funkyfraiche.blogspot.com/
Love, L
Lovely DIY indeed ;)
http://www.snowblackblog.com/
great work!!!
xoxo
townofstyle.blogspot.com
Love this idea!! I may have to try that in my boutique! It would look so cute with to display all the rings! Glad I came across your blog!
xx
e.
awesome DIY
www.chasedakota.blogspot.com
This is an amazing idea, I'm so going to do this some time over the next week! Love it and the blog is super cute too, following you with blogger!
Just posted some outfit posts if anybody is interested.
Love C
http://booksboysandblouses@blogspot.com
Amazing idea!! Also: I concur - wine is necessary whilst doing DIYs!!
Good on you, and thanks for sharing the photo. Drop by me too when you have time.
Cheers.
a constant dilemma with my jewelry as well.
haha I have the same problem.. I design clothes and jewerly and I have a lot of pieces I've made for me.. stored in several jewerly boxes.. this jewerly stand looks awesome, did you do it?!
Post a Comment