Pages

Showing posts with label DIY. Show all posts

Sunday, December 2, 2012

DIY Vintage Purse Necklace


Okay, so this DIY has been swirling around in my inspiration folder forever.....literally since Issue 11 of ARISE Magazine.  In the mag's fashion spread Great Plains I came across the above snapshot and couldn't help but notice the striking necklace duo fashioned out of coin purse findings.  I loved the idea and since that day it has been on the list of to-do's and this weekend I've finally just gotten around to making it. 


The original design is from Patricia Nicolas (seen above) and is so fantastic.  Luckily its a very simple idea to recreate and my local Jo Anns has a lovely section dedicated to making your own handbags.  Follow below and make your own...

B U Y  T H I S :
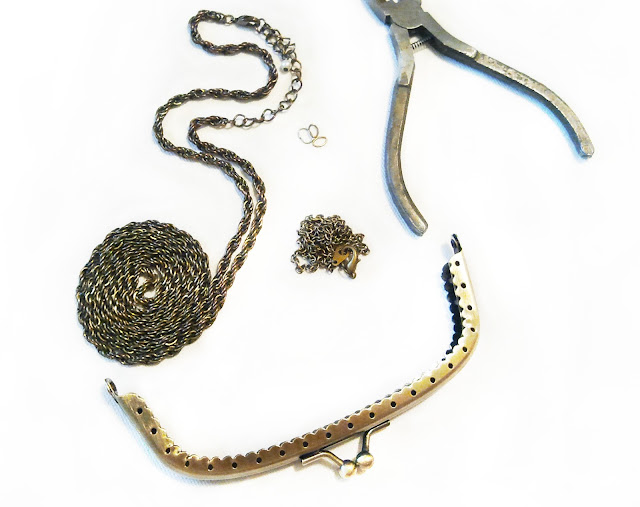
  • Coin purse finding
  • Two different chains (chunky and delicate)
  • Jump rings
  • Flat nose pliers
  • Simple charm
N O W  D O   T H I S :
  • Line up your chain with the coin purse clasp
  • Begin connecting the chain to the clasp where traditionally you would sew the actual bag to it.  It took about 20 jump rings to fully connect the chain and I only did one side.
  • Adjust the chain to your desired length 
  • Connect the thinner chain to the charm and then connect that piece to the necklace
  • And congrats your done


Its super easy and would make a great gift for the Bestie this gift giving season...seeing as it is right on us.  


Saturday, December 1, 2012

Saturday Morning - Foodie Alert


When I lived in Boston I was a regular at Au Bon Pain. Not only did they have the best assortment of on the go food and half price baked goodies after 4pm but they had this amazing dish that satisfied my sweet and salty side.  It was apples, blue cheese, cranberries and and gorgonzola cheese all swirled together.  Paired with my venti white chocolate mocha (double shot) and I was ready for Global Markets.  But like all cafes menus change and like all budgets they get smaller and before I knew it I could no longer afford to blow upwards of $50 a week on eating out.  Forced to do it myself I can now enjoy my favorite snack anytime I want...like right now as I am writing this quick post.

W H A T   T O   B U Y :
  • Apples (your choice, I went with Gala Apples because of their sweetness and they work well with salads)
  • Gorgonzola cheese crumbles
  • Dried cranberries 
  • Blue cheese dressing
W H A T   T O   D O :
  • Chop the apple up into chunks
  • Sprinkle cheese crumbles
  • Sprinkle cranberries
  • Now top with dressing to your liking

Its a super easy recipe and easy enough to make per serving since I am not a fan of browning apples and I love it better when the apples are still crisp.  Although I will have this version for lunch at work you could switch things up a bit by adding a handful of almonds into the mix, pour it all over baby spinach and top with a balsamic vinaigrette instead of the blue cheese.  And depending on how heavy your hand is this quick meal is under 400 calories falling right in line with a standard breakfast.  Whether or not it contains the right amount of whatever is argueable but I can say you will feel much better eating this than an Egg McMuffin or two with its alarming sodium count. 


So here's to a healthy start to your Saturday especially after round 1 of holiday food enjoyment.


Sunday, October 7, 2012

The Art Of Pumpkins - DIY Inspiration


The Black Lace Beauty

Toile Me

The Floral Explosion

Patterned Lace Pumpkins

The Murals

Bring on The Bling

Yarn Play

Print Me
From interesting textures to mixed prints these pumpkins are far from ghoulish and right on trend for Fall 2012.  Although I have always been a fan of the holiday (mostly for the candy) I can not say I was ever into decorating for Halloween.  Especially now, I find it difficult to spend money on a costume let alone on tools and supplies for carving pumpkins.  With that said, these great ideas are right up my alley of crafting and leave such a great end result I could actually keep the festive pumpkins around way past the end of the month. 

Just click the description and get inspired this Sunday....

Thursday, September 27, 2012

Foodie Alert - Edible DIY


No I have not turned this amazing dress into some sort of DIY inspiration using food as wearable embellishment.  Instead this just so happens to be a dress about as delightful as the recipe I  repinned this morning.  With my mom coming back from almost a month in Hawaii and getting over jet lag being the only thing I want her to worry about, I was also thinking about baking something (aside from making dinner) that she can snack on while in and out of sleep.  Enter the video below....


and the recipe that followed
Here's to a delicious weekend...

and maybe a small hunt for a very similar amazing beaded dress in rich shades of brown that looks just as effortless and can be paired with combat boots or heels a like...

just saying

Monday, August 20, 2012

****DIY Adjustable Wire Bangles****


As I've mentioned before, the fiance and I have visited Newport, RI almost every year for the past 9 years.  Some may think its about time to find a new vacation spot but for us it never gets old.  Yes we run into some of the same people and yeah nothing new (in terms of retail) has really popped up over these years.  But one major change has been the ever increasing Alex and Ani store.  What was once a very small location sandwhiched between a souvenier shop and great little boutique that carries a decent sized Ralph Lauren selection for men blossomed into two level boutique (year 4 or 5) and has now taken over the sovenier shop and half the retail space of the boutique.  Its absolutely amazing and wrist after wrist all you see is an Alex and Ani.  Its pretty much like the new Pandora.  

Intrigued the first time I came across the store, I wandered in only to wander right back out after seeing how beautifully simple the bracelets were and how scary the prices were on a few of my favorites.  Now I know they aren't Tiffany's prices and I'm pretty sure some of those heavily charmed Pandora bracelets cost about 30 Alex and Ani's but for me it just didn't seem fair and once I returned home to my needle nose pliers and wire cutters, I got right down to business.  (DIY after the jump)


Saturday, August 4, 2012

****Freshly Picked - Saturday Foodie Fun****


As if the highly addictive floral print trend wasn't enough burden on my wallet and closet, I had to go and discover another reason to love the fun, colorful and sometimes fragrant natural beauties. Birthed out of a wild idea fest of fun new popsicles by Meredith of Family Fresh Cooking and her two children, these flower infused frozen treats are not only beautiful to look at but healthy and delicious.  After stepping outside my frigid apartment to walk down to the laundry room and returning about as sweaty as if I'd gone out for a run, this recipe is exactly what I need right now.  Can't wait to try it and I'm wondering how I can incorporate this into the wedding plans without a meltdown disaster.....
....
.....
or bachelorette party....
......
.......
........
and infused with a bit of alchohol....


While my idea machine churns away, head to Farm Fresh for a list of local farms that offer edible flowers and follow the recipe below.

w h a t  t o  k n o w :
  • Prep Time: 5 minutes
  • Cook Time: 4 hours
  • Total Time: 3 hours, 5 minutes
  • Yield: 6 popsicles
  • Serving Size: 1/3 cup
i n g r e d i e n t s :
  • 16 ounces Cold Water
  • 1 ounce Orange Blossom Water
  • 1 teaspoon Lemon Juice
  • Plain Stevia Drops or your favorite natural sweetener to taste (Honey would be great too) I used one full dropper of stevia.
  • a handful of Organic Edible Flowers, rinsed and remove petals
  • popsicle molds or dixie cups 
  • popsicle sticks
w h a t  t o  d o :

  • Have pop molds handy and make sure you have room in your freezer. 
  • Combine water, orange blossom water and lemon juice. 
  • Sweeten to taste. 
  • Pour mixture into molds. 
  • Freeze without sticks and petals for about 1 hour. 
  • Remove from freezer and add flower petals. You can push them into the molds with the help of a long, skinny spoon or pop stick. 
  • Make sure the flowers are scattered throughout the pops. 
  • Add sticks and freeze for 2-3 hours more until solid. 

 
 Enjoy!!!!

Sunday, June 24, 2012

****Prickly - Thorn Stud Earring DIY****


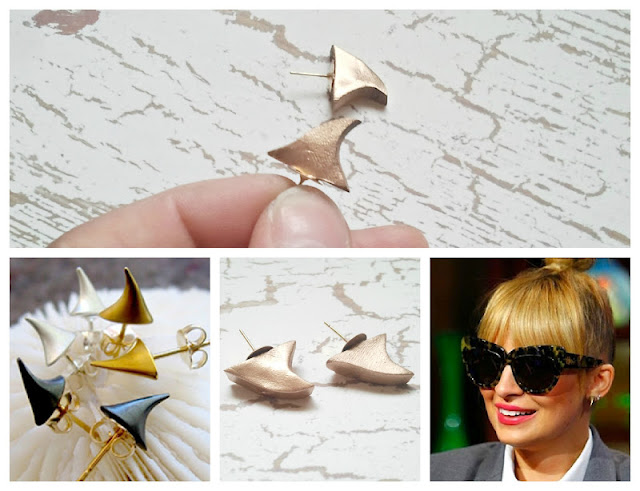
With all the neon and pattern mixing going on this summer I've found myself drawn to simpler accessories....studs in particular.  After going a bit overboard at one of my favorite bead stores a few months ago my go to pairs have been rough, uncut amythest or quartz nuggets but when I saw the thorn earrings by Lee Hale I promptly removed whatever was in my ear and got to making a pair for myself. 

WHAT YOU NEED:
  • Polymer clay
  • Clay knife/ Xacto
  • Earring posts (I used 6mm ones but I would definitely opt for a 4mm diameter so that your clay thorns don't have to be so thick)
  • E6000
  • Wax paper
  • Gold spray paint


WHAT TO DO:
  • Break off a piece of your clay and soften it up
  • Flatten it out a bit and then cut out two triangles
  • Keeping one side straight, slowly begin to create a curve on the other side
  • After shaping it to your liking go ahead and bake it.  I normally bake mine at 150 degrees on wax paper.  I normally keep checking it until its not flexible and then I know its done.
  • Once they cool off go ahead and spray paint.  I haven't used a can of spray paint since my last job as a visual assistant and even then I wasn't superb but I found the Krylon brand to be much easier to use.  It went on extremely light and misty offering up a really even coat.
  • Let it dry and spray the other side
  • Glue the golden thorns to the earring post then let dry overnight
  • All you have to do now is wear 'em out


Wednesday, May 23, 2012

****DIY Lanvin Raffia Earrings****


I have a twisted love affair with affair with Barneys.  Being that I am not a frequent charger (rather not one at all since I don't have any) nor am I attached to any significant amount of wealth, my frequent trips to their locations and website always end with me empty handed.  I'll touch, dream and even try on but very rarely to I splurge.....even upon entering their outlet locations and seeing Balmain at an additional 40% off the already steeply discounted goods. However I still go back time and time again.  While browsing the jewelry section online one day I put tons of images into DIY Inspiration folder and my first project up is my version of the lovely Raffia Mask and Flower Earrings from Lanvin.


WHAT YOU NEED:
  • Raffia
  • Pearls, Gemstones or any other smaller beads you have 
  • Jump Rings
  • Eye Pins
  • Earring Posts
  • Needle Nose Pliers
  • Wire Cutters
  • Round Nose Pliers
  • Scissors
  • Jump Rings

WHAT TO DO:


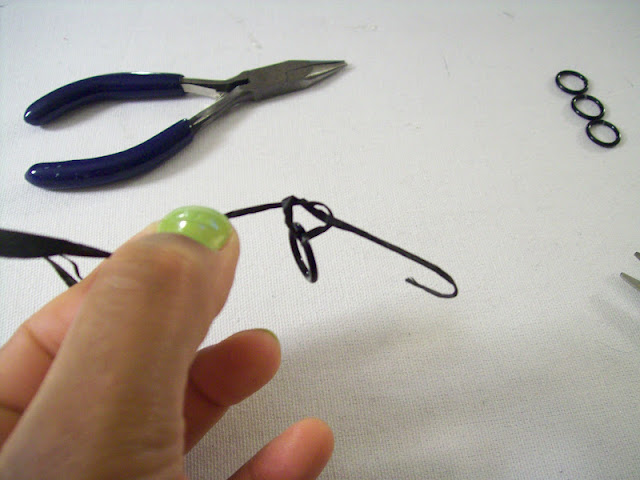
  • Begin cutting off small sections of the raffia and tie around your jump ring


  • Continue until whole jump ring is covered and their is very little give between strips. 


  • Now keep going until 4 jump rings are bursting with raffia

  • Trim those wild ends

  • Use another jump ring to attach two of the raffia circles together.  


  • Gather your chosen beads and get to adding a bit of glam


  • Attaching the beads can be difficult depending on how thick the raffia base is but a little bit of trial and error with your round nose pliers will help you find the right width of the loop  
  • As you attach your  beads, take some time to fluff up your raffia and create the right amount of character


Just about all of these supplies were already hiding out in my various craft boxes so that is why I chose to use all black raffia.  I will definitely be making another pair using lighter colors and different beads.  As with so many DIY's the possibilities are endless so get creative and have fun if you give it try.  Also feel free to send over some pics of your project and I will definitely showcase them!!!


Wednesday, May 16, 2012

****Simple Chain Cage Ring DIY****


Even though the trend has been floating around for sometime now, I am still smitten with the idea of encasing one my digits in some heavy metal.  Forever shopping for a new cage ring, I came across one and instead of hopping to buy it I immediately decided to turn simple DIY.  What was the inspiration you ask??


Its from Triskaidekaphobia's most recent collection and although this baby is to die for, at $160 per ring its quite the budget breaker.  No worries though, a little chain and about 10 minute was all I needed to recreate the idea.  Read up on all the details below and don't forget to also check out the rest of the collection from Triskaidekaphobia as the pieces are pretty lust worthy.


WHAT YOU NEED:
  • 2 different chains
  • Pliers
  • Ring sizer (optional)


NOW DO THIS:
  1. Wrap chain around your finger above the knuckle making sure the fit is snug. Connect the two ends.
  2. Wrap chain around the same finger below the knuckle again making sure the fit is snug. Connect the two ends.
  3. Measure out two pieces of chain that will run along both sides of your finger.  You want to make sure that the distance is short enough so it doesn't hang to low getting in your way  but long enough so that you can bend your finger.  This may take some adjusting and readjusting until it feels comfortable.  
  4. Attach to the two rings created in steps 1 and 2.
This is so easy and looks really cool on. 


Happy DIYing and see you next post..

Sunday, May 6, 2012

****Notes To A Friend - Handmade Clay Earrings DIY****


Right about now I am enjoying an early cocktail while soaking up all the rest I can get on vacation.  Nonetheless I did want to share with you a DIY I did last weekend.  My best friend and I are huge crafters.  Although most of my expertise so to speak lies in jewelry, she is amazing in not only jewelry but crocheting.  A few years back she gave me a gorgeous gray and white crocheted blanket that is heavier than it looks, extremely efficient at keeping you warm and the pattern she used resembles little bunnies all in a row (Bunny happens to be a nickname given to me by my boyfriend that has really stuck).  Also, instead of doing the usual present exchange on birthdays and Christmas we tend to sporadically dole them out as we please.  The tradition started while we were in college.  Time was not on our side and it always seemed that around summer we were handing out last year's presents at the same time we were beginning the current year's holiday shopping so to ease up on the rush we just accepted that presents will be handed out randomly.  Now between the both of us we have bags full of chain, beads, fabric, and yarn sitting around waiting for the projects to commence and most of the time we end up handing out presents bought instead of handmade...lol.

But, getting back on track, this little idea has been itching for completion for sometime now and this weekend was pretty mild so I was able to check it off the list.  The idea stems from her love the earring assortment packages you can get at Forever 21 or H&M that offer  anywhere 6-8 pairs.  She stock piles these and who can blame her really....they're usually super adorable.

While browsing around the craft store near the clay section, I saw a spring mix of mini cookie cutters and the idea really seemed possible.  I practiced a bit and even gave her a few of my first attempts which she loved but I still wanted to do the assortment.  It was really fun and very easy and I can't wait to give them to her.

GRAB THESE:
  • Polymer clay 
  • Mini cookie cutters (a small selection should be available with the clay in your local craft store but you can find them on Etsy or Amazon)
  • Exacto 
  • Wax paper
  • Acrylic paint
  • Disposable containers for paint (I used tuna can..lol)
  • Paint brush
  • Rolling bin or round object
  • Tweezers
  • Flatback earring posts
  • E6000
  • Plain stationary 
NOW DO THIS:

  • Break off chunks of the clay and soften them up 
  • Lay out your wax paper and begin to flatten clay into a thin sheet

  •  Cut out your shapes. With my cutters the shapes proved to be ever so attached to the inside of the mold and I had to use a slim stick to gently push them out.  
  • Following the instructions on the clay packaging turn on your oven to required temperature
  • Lay wax paper onto a baking sheet and them place your shapes on the paper
  • Now bake away

  •  In about 15min my pieces were done but do check on the occassionally as it could take more or less time.  I normally judge their readiness based on how bendable the piece is...the more flexibility means a bit more time needed in the oven.  But remember to check the instructions on the clay as each brand tends to be a bit different.
  • Painting time!!! I wanted to color block my so it took quite a few coats of each color.  Plus all I had left were these colors and I opted for pastel paint.
  • It may be easier to use the tweezers to hold steady the shapes as you paint


  • Let them dry really well after each coat and if you prefer a glossy finish now would be the time to slather it on
  • All dry??  Great use the crafter's favorite adhesive, E6000, to attach the earring posts on the shapes.
  • Let the glue dry overnite for optimum results
Because packaging is everything and I am away on vacation this week, I thought it would be nice to mail the earring set to her.  You'd be surprised how pleasant it is to receive a piece of mail that isn't a bill, solicitation, or random sales flyer.  Especially with so much being handled online, why not give your local post office a bit of work.  I found these large blank cards with envelopes for a dollar at the craft store so after putting in a few holes I attached the earrings, used my signature stamp (that she actually found in a clearance bin one day for me) on the front and added a cute little message  inside.  Using an insane amount of bubble wrap to protect the package, I slipped it into a larger envelope and sent it out.


There is so much versatility with this project and because of its simplicity even a child can do it (saving the glue for adults though...E6000 is not something to play around with LOL).  With Mother's Day just around the corner I may track down a new assortment of cutters and give it a go for Mom.  I know that others use the polymer clay molds which actually come in a wider variety of shapes and objects so feel free to try those out as well.  Also I would love to try this with the translucent clay and then try another set with the gold leafing.  As I said, this is extremely versatile and open to any sort interpretation.

Do share if you make some of your own too!!!
Related Posts Plugin for WordPress, Blogger...