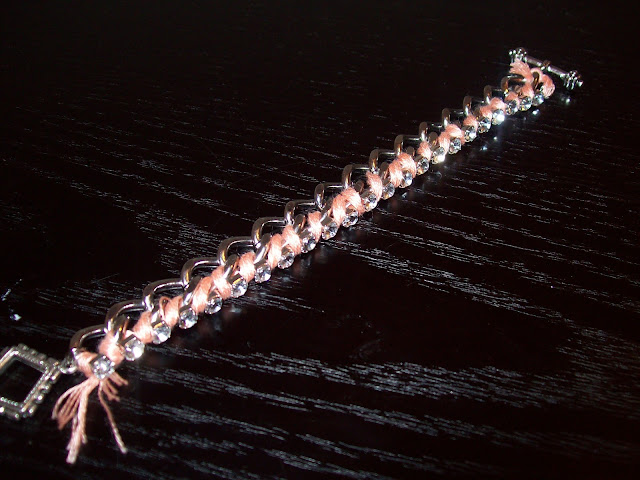
So I officially have a new addiction....beyond beautiful beads, leather and chain I now am trying to make room for all the embroidery thread I've been purchasing. And why you may ask.......
This Spring, color has returned and my eyes have been zeroing in on all things lemon, teal, coral, magenta and lime. Anything vibrant. Everything bright. I was even skimming through the IKEA catalog and came across some of their fabrics instantly thinking how cheerful the bedroom would look with a FREDRIKA duvet cover with coordinating shams or maybe even ANNAMOA curtains. The problem is though, this obsession with bold colors doesn't just stop with my frequent redecorating daydreams. Thanks to the embroidery thread aisles at the local craft and fabric stores, I can now own little samples of all the amazing colors I love.Unfortunately, reality recently set in and with the ever growing rainbow bag of thread I realized that it was about high time I use the thread for something.
Perfect timing as the wonder thread has been making its way around the accessory world.
Now, this isn't my first encounter with duo of thread and chain. Back in September I made a necklace with this technique...one that I have since decided shouldn't be a necklace and as we speak remains clasp-less on my jewelry tray waiting for the light bulb to go off in my head.... so this project was not as daunting as some of my others.
First thing is to pick out the colors you want to use and your chain. This is probably the most difficult step. Are you aware that Jo-Anns has about 10 different corals and another 50 or more coordinating pinks and purples?
Unlike my last embroidery thread DIY where it was just thread and chain, I wanted to add a bit of sparkle to my bracelet (couldn't remember if I told you what I was making yet) so I bought some rhinestone chain. Next I cut 3 long pieces of the orange sorbet colored thread and tied it to the foundation chain. I secured the chain to a safety pin (actually an abandoned DIY project that I should really continue with) and laid the rhinestone chain along side it. Once everything was aligned I began to wrap my thread around not only the chain but also around the rhinestone chain.
The trick is to make sure the thread wraps around the rhinestone chain and falls in between each rhinestone. Now, this may not allow for perfect alignment between the foundation chain and the rhinestone chain but a pattern will surface as you continue to wrap all the way down making the slightly off seem perfectly correct.
As you can see I didn't measure the rhinestone before I began and it can prove to be slightly difficult finding the right piece to snip but once your down wrapping, tie off the the thread, snip the ends to your desired length, add a clasp and you're all done.
If you didn't notice, I only used one color in this bracelet. You can definitely add more than one color in the mix but because the rhinestones were on the smaller side, I was concerned the additional thread would over power them and it would be difficult to keep the thread contained between each rhinestone. Either way I was so siked at the end result I went a lil embroidery thread crazy........literally...
I especially like the idea with this one. I used four strands of each color and after the thread was tightly wrapped around the chain and tied off at either end, I went in and began to distress the thread, snipping and knotting chaotically to create a pretty unique look.
This is a much simpler option using just the rhinestone chain and thread. The effect is sleek and colorful. A wrist full of these babies would be a perfect spring/summer option. Done slightly different, after wrapping the thread around and making sure each end is knotted securely, a dab of fabric/craft glue was added. With the other bracelets, I really liked the idea of the wild/loose ends. However with these more delicate babies, I thought a more refined finish was needed.
All I know is that with these ideas being so simple to make, my spring/summer looks will be filled with pops of color. Till the next post....
P.S. Stay tuned as I am in the process of getting everything together for the first giveaway on my blog :)


3 comments:
those are soo cute!
<3 http://eccentricdaydream.blogspot.com/
i love, love, love this... you are so talented
rulymuse.blogspot.com
I really like these bracelets!
Great idea!
Post a Comment