Pages
Showing posts with label christmas diy projects. Show all posts
Wednesday, December 12, 2012
DIY H&M x Margiela Leather Glove Coin Purse Necklace
So your best friend waited in line and still didn't manage to grab a single piece of the H&M x Margiela collection. That's unfortunate and judging the prices on eBay for some of the merch its looking like she will just have to catch the next one or really, really pray that some of the stuff ends up at a local Salvation Army like with the Missoni for Target.
Considering how completely unlikely that last idea is I would suggest this easy DIY and surprise her with a unique piece of her own based of the collection she missed. (DIY after the jump)
Sunday, December 2, 2012
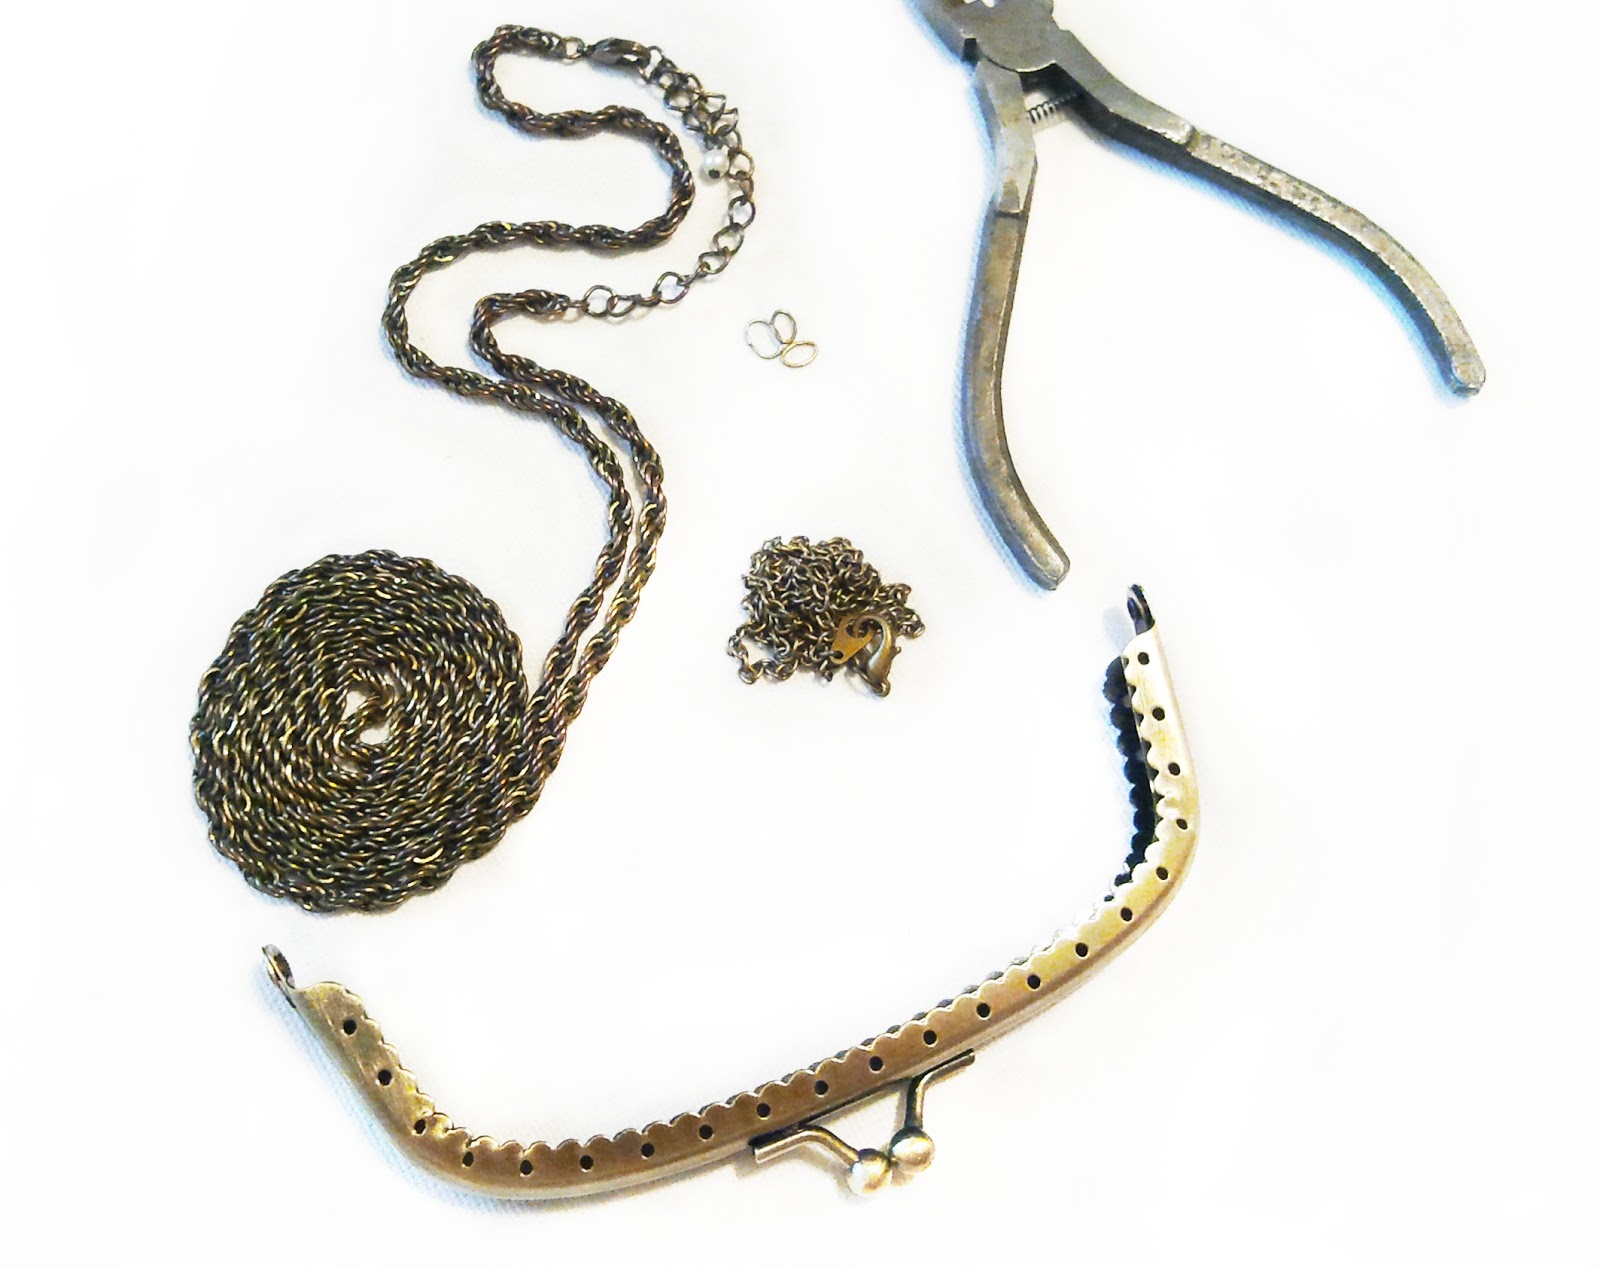
DIY Vintage Purse Necklace
Okay, so this DIY has been swirling around in my inspiration folder forever.....literally since Issue 11 of ARISE Magazine. In the mag's fashion spread Great Plains I came across the above snapshot and couldn't help but notice the striking necklace duo fashioned out of coin purse findings. I loved the idea and since that day it has been on the list of to-do's and this weekend I've finally just gotten around to making it.
The original design is from Patricia Nicolas (seen above) and is so fantastic. Luckily its a very simple idea to recreate and my local Jo Anns has a lovely section dedicated to making your own handbags. Follow below and make your own...
B U Y T H I S :
- Coin purse finding
- Two different chains (chunky and delicate)
- Jump rings
- Flat nose pliers
- Simple charm
- Line up your chain with the coin purse clasp
- Begin connecting the chain to the clasp where traditionally you would sew the actual bag to it. It took about 20 jump rings to fully connect the chain and I only did one side.
- Adjust the chain to your desired length
- Connect the thinner chain to the charm and then connect that piece to the necklace
- And congrats your done
Its super easy and would make a great gift for the Bestie this gift giving season...seeing as it is right on us.
Friday, August 31, 2012
DIY Bath And Body Products
There's no lie in saying women like their toiletries. Talking first hand I couldn't begin to tell you how much money of mine Victoria Secrets, Bath & Body Works, LUSH and Crabtree & Evelyn have gotten since I've been gainfully employeed. Over the years though I have curbed my need for quantity and today I can say I buy what works and only what I need. However, while vacationing I noticed a major influx of beauty shops offering bath bombs, lotions and rose water like sprays that took me by surprise. One store in particular grabbed my attention with the amazing smell that laid heavy in the air as you walked by and the amazing cupcake like treats outside on display. Originally I thought they were edible (and so did my fiance) but as soon as we approached I realized they weren't food and before you knew it we were being whisked inside by an award winning sales associate.
She gave my hands a mini treatment and showed me what one of my nails could look like if I used her completely unique nail buffer all in the blink of an eye before I could even turn down her offer. (I blamed my lack of resistance on being food drunk from a heavy meal of fried calamari and slightly tipsy off of a few Long Islands). Anywho the time soon came and it was down to business. She gave me her sale closing pitch and as I felt my glowing, soft hands and regurgitated all the reasons why I should just buy the damn lotion the grand total was about as sobering as waking up in the drunk tank on a Saturday morning in Las Vegas (nope never happened but I can only imagine). The lotion and body scrub were $65 a piece but she could give me both for the price of one. $65 for a damn jar of coco butter infused lotion and a body scrub.......completely outragious.
As I walked out the store I couldn't help but laugh at the other shoppers in line willing to drop such an egregious amount of money on products offering no long term benefits what so ever. At least that $80 vile of serum from Estee Lauder gives you youthful looking skin.
As we walked on that night I spent time searching for at home recipes for some of the most used beauty products. Now, armed with such information won't stop me from splurging on a Sex Bomb every once in a while when I pass LUSH in Boston but it will keep me from answering the call of another well versed sales associate. Take a look below and feast your eyes on the now declassified articles your local Body Works doesn't want you to see...
Just because summer's over and your soon to be fading tan will be fashionably covered by nubby sweaters doesn't mean you should let go of your touchably soft skin. These easy to make bath scrubs will keep your skin bikini ready all year long...
When's the last time you took time to enjoy a good bath? Well, making a few of these should help rekindle the flame..
And once your done why not lather on homemade lotion and spritz a customized fragrance..
- Vitamin E and Coco Butter Lotion Infused with Essential Oil
- Simple Lotion Bar Recipe
- Overnight Hand Softner
- Tangerine Face Cream
- Natural Perfume Recipes
- Step by Step Rosewater DIY
The possibilities are endless when it comes to any of these easy to do recipes. Once you've got the technique down and a good supply of basic ingredients like glycerin, shea butter or citric acid you can create everything under the sun.
Lets also remember that Christmas is literally around the corner. I am in the process of making room for my holiday merchandise as we speak at work and last week I started receiving my ornaments. With that horrible statement said, these DIYs would make excellent gifts. Find some really special molds (I love these, these, these and oh yeah these are adorable), some really great packaging and your holiday shopping woes are slightly over.
Before I go I also wanted to share a really cool soap making DIY that looks so simple I may have to start with this one.
Monday, August 20, 2012
****DIY Adjustable Wire Bangles****
As I've mentioned before, the fiance and I have visited Newport, RI almost every year for the past 9 years. Some may think its about time to find a new vacation spot but for us it never gets old. Yes we run into some of the same people and yeah nothing new (in terms of retail) has really popped up over these years. But one major change has been the ever increasing Alex and Ani store. What was once a very small location sandwhiched between a souvenier shop and great little boutique that carries a decent sized Ralph Lauren selection for men blossomed into two level boutique (year 4 or 5) and has now taken over the sovenier shop and half the retail space of the boutique. Its absolutely amazing and wrist after wrist all you see is an Alex and Ani. Its pretty much like the new Pandora.
Intrigued the first time I came across the store, I wandered in only to wander right back out after seeing how beautifully simple the bracelets were and how scary the prices were on a few of my favorites. Now I know they aren't Tiffany's prices and I'm pretty sure some of those heavily charmed Pandora bracelets cost about 30 Alex and Ani's but for me it just didn't seem fair and once I returned home to my needle nose pliers and wire cutters, I got right down to business. (DIY after the jump)
Sunday, December 11, 2011
****Xmas Rush DIY 002****
Everyone has a fridge and, well, unless Chanel collaborated with Kenmore recently (and if so please leave a the link in a comment below...I may not own a home but that doesn't mean I don't need a very fancy designer appliance....lol) every single one could use a bit of sprucing up. And that's where round two of my holiday DIY posts comes into play. Using broken jewelry I'm sure we all have (or vintage pieces just acquired for the task at hand) you can easily turn the stark white rectangle in that room we all usually hate to use into something a bit more eye pleasing.
YOUR LIST:
- Old earrings (vintage clip ons or pierced variety will do)
- E-6000
- Nips
- Magnets (found at craft store)
WHAT TO DO:
First things first we need to remove any trace of the future magnets past life. It may be slightly difficult with the clip on earrings but try to severe it as much as possible. With the earring posts one simple snip will do.
Now whip out the handy E-6000 and get to gluing. Be wary though, only a droplet will suffice and we want to make sure the end result is neat and doesn't look like we did this over a bottle of white, tiramisu and sitcom re-runs. We want the receiver to feel like we worked very hard to please and surprise them. I was lucky enough to find magnets pre-cut into the perfect sized circles. If you find yourself in no such position they did have rolls of magnetic strips in various widths and the pre-cut squares.
Take another sip of your favorite poison and a bite of that savory snack while you let these bad boys dry. Hell you could even go to sleep. Its best to let them set overnight.
And your done. Just wrap it up nicely and gift away.
Don't have the time? Just head on over to the Blog Shop and follow the instructions...
Friday, December 9, 2011
****Xmas Rush DIY 001****
With 15 days left till Christmas you may be frantically pacing the floor wondering what to do about gifts.
First I want you to breathe...
Contain your anxiety...
Good?
Good, now read on for this easy to do DIY that won't break the bank. Oh...your done with your shopping? Got everyone on the list? Even the Under $10 Secret Santa gift? Well fine then over achiever, you can read on just for fun....
YOUR LIST:
- E-6000
- Flat top ring bases
- Scrapbooking Fabric Covered Stickers/Buttons
NOW DO THIS:
- Pick out the scapbooking buttons you want to use and the ring bases
- Add a dab (very small amount so it wont get messy) to the center of ring base top
- Add button
- Place button fabric side down on a flat surface to dry
- Adjust ring base if slippage occured during last step
- Let dry for 24 hours
The aisles at your local craft store will seem to be littered with scrapbook materials so the hardest part will be determining which ones to buy. You can get specific ones for certain friends or relatives and still have money left over for a candy bar to snack on while waiting in line.....
Oh yes, the lines will be long and filled with screaming children and disgruntled husbands/boyfriends who don't understand why they couldn't just wait in the car despite the purchase being for his mother/sister/grandmother/aunt. You may even witness the rare occurance of an upset shopper who swears the sign said $2.99 instead of $4.99. You never know...
To busy to make it yourself? You're in luck. The "Blog Shop" is officially opened and these babies are now up for grabs. It will cost $15 buck for the two and if need more let me know. Want it shipped gift wrapped directly to the lucky lady? Not a problem. I'll do it. Just head on over either through the link above or via the tab on my header, check out the shop policies and hit me up.
And yes, the Blog Shop is new and I will be adding tons of items (handmade and vintage) constantly so make sure you stay updated by following the shop with Bloglovin.
Sunday, November 13, 2011
****Suede Coin Purse Necklace- DIY****
Some time ago I came across a picture of suede pouch necklace and told myself I should make one. That was about a year ago and here we are today. Talk about procrastination. Anywho, as long as you have a leather needle and a sharp blade this is one super easy DIY.
And your shopping list should look something like this..
- leather/suede scraps (grabbed a scrap bag from craft store for $4)
- leather needle
- embroidery thread
- button
- long chain
- X-Acto
- straight edge
Now lets get started...
For a straight edge I ended up using my clay knife but a ruler or a book would work just the same.
Determine the size and shape of your pouch and for clean lines slice with your blade.
Fold the bottom part of fabric up leaving just enough remaining fabric to create the flap.
I wanted to use a contrasting pop of color so I chose coral embroidery thread. Because even with the specific needle puncturing the fabric can still be difficult, I once again used my blade and created the wholes first. It made the process so much easier and faster. Line you straight edge along the side so that the holes will all line up.
Using your leather needle, thread it and begin to sew up on side of the pouch. You want the stitching to go along the outside so making the back side of the pouch your initial entry point, pull the needle up through the hole, wrap around the outer edge and back up through the next whole. Repeat this all the way up that side ensuring that the excess thread ends up again on back side. Tie off the ends.
Now, with one side still untouched, grab your button and figure out how you want it to close. I decided to put my flap on a slant which required me to use the straight edge and blade to trim off the excess. I figured out where I would like my button to sit, sliced an opening in the flap just large enough to get the button through and then sewed the button on.
I sewed up the other side the same way and then added some decorative stitching along the border of the flap. Next I sliced a small hole on the back side of the flap for my large jump ring and attached the chain.
I wanted the chain to be long so that this would make a great layering piece. With Christmas in less than 60 days, this is a great present for any friend, cousin or Secret Santa party at work.
For a straight edge I ended up using my clay knife but a ruler or a book would work just the same.
Determine the size and shape of your pouch and for clean lines slice with your blade.
Fold the bottom part of fabric up leaving just enough remaining fabric to create the flap.
I wanted to use a contrasting pop of color so I chose coral embroidery thread. Because even with the specific needle puncturing the fabric can still be difficult, I once again used my blade and created the wholes first. It made the process so much easier and faster. Line you straight edge along the side so that the holes will all line up.
Using your leather needle, thread it and begin to sew up on side of the pouch. You want the stitching to go along the outside so making the back side of the pouch your initial entry point, pull the needle up through the hole, wrap around the outer edge and back up through the next whole. Repeat this all the way up that side ensuring that the excess thread ends up again on back side. Tie off the ends.
Now, with one side still untouched, grab your button and figure out how you want it to close. I decided to put my flap on a slant which required me to use the straight edge and blade to trim off the excess. I figured out where I would like my button to sit, sliced an opening in the flap just large enough to get the button through and then sewed the button on.
I sewed up the other side the same way and then added some decorative stitching along the border of the flap. Next I sliced a small hole on the back side of the flap for my large jump ring and attached the chain.
I wanted the chain to be long so that this would make a great layering piece. With Christmas in less than 60 days, this is a great present for any friend, cousin or Secret Santa party at work.
Wednesday, November 9, 2011
****Vintage Renewal 001 - DIY****
Embellished collars and chokers seem to be a pretty exciting trend right now and it got me to thinking about a different spin on adorned neckline idea. So with a vintage tie from Grandpa, a couple random buttons from a craft store variety pack, a needle and some thread I got inspired.
WHAT YOU'LL NEED:
- Neck tie (vintage or not)
- Sharp blade
- Invisible thread (It was late and my sewing skills are the best so I figured most of my mistakes would be hard to see with invisible thread. You could you what ever thread you like)
- Needle
- Buttons
- Pins
So first you want to play around and come up with a good pattern. This took quite some time for me especially as I started working around to the other side of the piece. It would be a good idea to, every so often, put it around your neck to make sure it's laying properly. Once you've got your design down, tack it in place.
Now get to sewin'
With it all sewn in place, grab the buttons (I used three) and mark where you would like to lie. Make a narrow slit in the fabric just long and wide enough for the fastening button to get through.
To keep the piece looking refined I made an attempt at finishing the button hole with contrasting ice blue thread. I just sewed around the whole enclosing the freshly sliced fabric. Now first I want to put it out there that I am not the best sewer and also to keep the giggles to yourself when you scroll down to the next picture.
It's pretty scary but lucky the button cover most of it. Add the rest of your buttons and show it off.
I have quite a handful of vintage ties and this was relatively easy so I am pretty sure I will continue making these. Who knows, maybe a few will wind up on my Etsy store......of course after I nail down the button hole finishing technique or head back home to my Mom's and use her sewing machine..hehehe
Have a great evening and see ya next post...
Labels:
christmas diy projects,
DIY,
vintage,
vintage renewal
Friday, October 28, 2011
****Pancakes and Clay - DIY****
So its raining outside, it was a long day at work and I need to relax before the weekend. Sounds like the perfect ingredients for an evening DIY and seeing as I have been way behind on posting some of the projects I have been working on I figured I'd start with my first foray into the world of FIMO and my very first handmade geometric pendant.
What You Need:
- Clay (FIMO or Sculpee)
- Sharp clay knife or Xacto
- Eye and head pins
- Chain
- Ring base
- Wax paper
- Baking sheet
- Needle nose pliers
- Wire cutters
- Necklace clasps
- E6000
So with all your supplies handy...
With your clay unwrapped and wax paper laid down, begin cutting up the pieces you will need for the pendant. Although the possibilities are endless, for this example we will need 3 rectangular blocks in varying widths. Using the clay knife, slice off the chunks needed and trim to create sharp edges. Then repeat two more times.
Arrange the clay blocks in the order you would like
Next take 2 eye pins and insert them into the clay to establish the
holes. Make sure the path is clean as it will be much easier to
reinsert them after the pieces are baked so go ahead and slide it
through a few times.
Congratulations this trio is all ready for the oven.
But wait...
What about all those scraps? You don't want to let them go to waste do you?
First we will start with the large, left over chunks. Using your clay knife begin slicing off the corners. After each slice rotate the clay chunk and slice again.
In the end what you want to have is a faceted clay bead. When you create the right one, take another eye pin and create the hole. Repeat this step with the left overs in the other colors too if you'd like.
Put those beads to the side with the first pendant and left work with the tiny scraps now. Take them all and roll them into a ball.
Swirling the colors together creates a marble print and with that we will repeat the steps and create another faceted bead. Go ahead and slice away...
No eye pins needed with these babies and I promise now we are ready to bake. Tear off a fresh sheet of wax paper and lay it out on the baking sheet. You could read the instructions on the clay wrapper for baking instructions but I set my oven to 150 degrees. A high heat isn't neccessary and you could probably put your oven on warm if that is the lowest setting available. Place your beads on the wax paper, sans the eye pins if you kept them in till now, and place in the oven.
Now keep everyone away from the oven and let these babies bake away. I gave them about 15 minutes in the oven because of the thickness. However you can casually check on their status making sure that the bead is not soft of bendable. Once done, let them cool and then bring them back to the work station.
Starting with the first pendant, reinsert the eye and head pins (for the bottom section) and measure out your chain length. Attach the chain and clasps and your done
Grab your E6000 glue, ring base and marble beads next. Add a dollop of adhesive to the base top and then gently position the marble bead where you would like it to sit. Allow this to dry overnight for it to set without injury or to much shifting aound.
Lastly add the eye pins to the last two faceted beads, attach to the remaining chain and fastener, and VIOLA!!
Hopefully by now you have gotten the idea as to how addictive this DIY project can be and with all the supplies costing atleast $6 and under, it also makes for a very easy reasonable one. But as I said earlier the possibilities with this are endless. Using the same process I made a really cool harness necklace.
Congrats...you have just created 4 more jewelry pieces. And your probably still looking at the title and wondering exactly what pancakes have to do with this DIY....
What can I say except I was hungry.....lol
Subscribe to:
Posts (Atom)