Pages

Showing posts with label easy DIY gifts. Show all posts

Thursday, December 6, 2012

Last Minute DIY Gifts 002 - Hostess Edition


Alright, so my For The Hostess Gift Guide didn't quite do it for you.  Being the crafter that you are, you really want to wow with something homemade.  Not a problem because just below you'll find over 20 amazing DIY gift ideas for the home and for your Hostess.  From infused liquor ready in a week to quirky, glitterful candles perfect for any mantle or holiday table to savory edibles that may not make to the giftee.  But enough talking, just clicks the link below to get started.....

Happy Crafting!!!!


F O R    T H E    H O M E


F O O D   F U N  

Sunday, December 2, 2012

DIY Vintage Purse Necklace


Okay, so this DIY has been swirling around in my inspiration folder forever.....literally since Issue 11 of ARISE Magazine.  In the mag's fashion spread Great Plains I came across the above snapshot and couldn't help but notice the striking necklace duo fashioned out of coin purse findings.  I loved the idea and since that day it has been on the list of to-do's and this weekend I've finally just gotten around to making it. 


The original design is from Patricia Nicolas (seen above) and is so fantastic.  Luckily its a very simple idea to recreate and my local Jo Anns has a lovely section dedicated to making your own handbags.  Follow below and make your own...

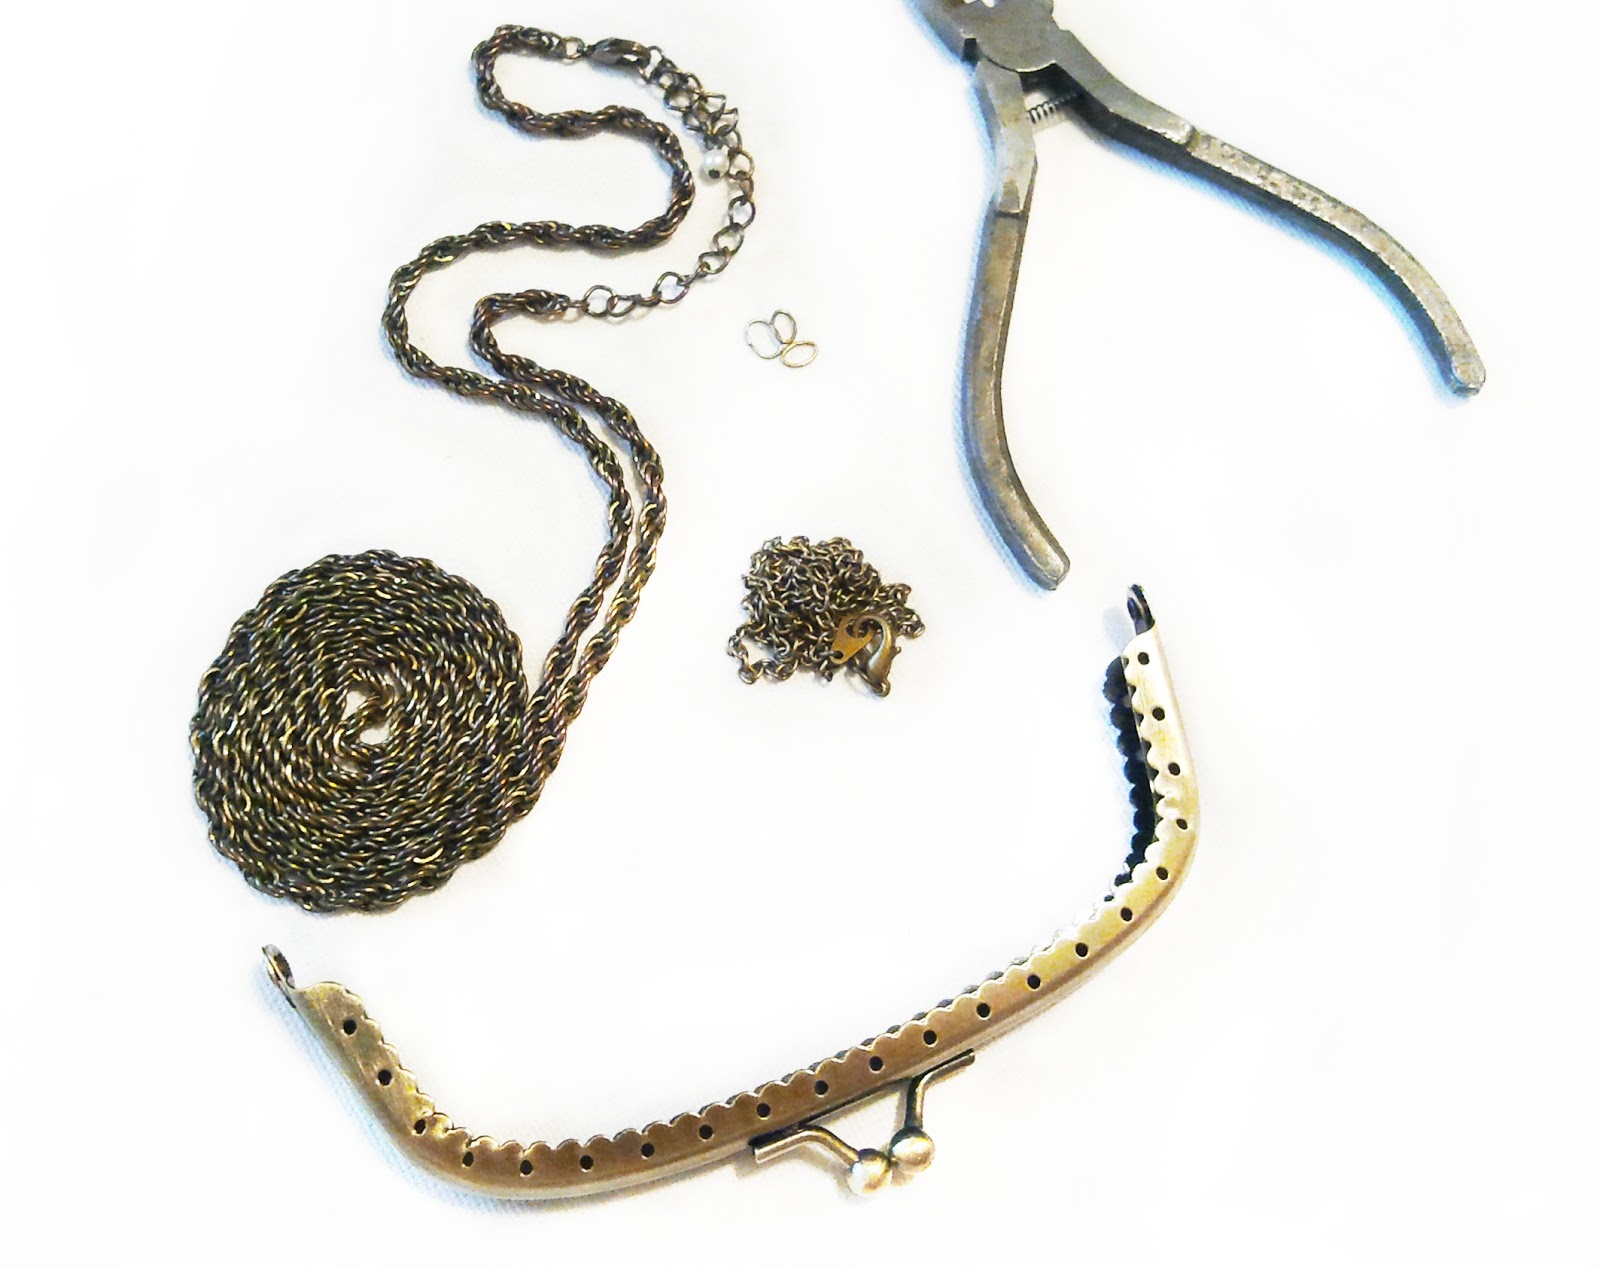
B U Y  T H I S :
  • Coin purse finding
  • Two different chains (chunky and delicate)
  • Jump rings
  • Flat nose pliers
  • Simple charm
N O W  D O   T H I S :
  • Line up your chain with the coin purse clasp
  • Begin connecting the chain to the clasp where traditionally you would sew the actual bag to it.  It took about 20 jump rings to fully connect the chain and I only did one side.
  • Adjust the chain to your desired length 
  • Connect the thinner chain to the charm and then connect that piece to the necklace
  • And congrats your done


Its super easy and would make a great gift for the Bestie this gift giving season...seeing as it is right on us.  


Monday, October 1, 2012

DIY Pyramid Stud Earrings


I'm a little addicted to heavy metal accents and since I have yet to find the perfect garment to use the bulk of my pyramid studs on and I have lost the will and patience to wait for said garment, I decided to go ahead and turn two into my new favorite pair of earrings.  


BUY THIS:

  • Pyramid Studs
  • Cardboard
  • Earring Posts
  • E6000
  • Pliers
  • Xacto
DO THIS:


  •  Insert the studs into the cardboard 
  • Remove and trace the circle (or if you talented just go right to the next step)
  • Using the xacto cut out the circle
  • Push the cardboard cutouts into the stud and then using your pliers fold the prongs over securing the cardboard 
  •  Add a dollop of glue to the back of the earring posts then gently slide the posts onto the cardboard and under one or two of the prongs
  • Let dry and wear out


You could always just go ahead and glue the posts to the cardboard pieces prior to inserting them into the back of the studs but either way is pretty easy.  I also tried to keep the post off center so it would sit lower on my ear....not so dead center.

Anywho I desperately needed something to constructively decompress after work.  It's looking like another six day work week for me and still a decent amount of work left to do in order to be 100% set for the Christmas (yes already....don't mean to scare you).  Hope you had a great weekend and I can't wait to show you some snapshots of mine and my candy making adventures. 

See ya next post..

Friday, August 31, 2012

DIY Bath And Body Products


There's no lie in saying women like their toiletries.  Talking first hand I couldn't begin to tell you how much money of mine Victoria Secrets, Bath & Body Works, LUSH and Crabtree & Evelyn have gotten since I've been gainfully employeed.  Over the years though I have curbed my need for quantity and today I can say I buy what works and only what I need.  However, while vacationing I noticed a major influx of beauty shops offering bath bombs, lotions and rose water like sprays that took me by surprise.  One store in particular grabbed my attention with the amazing smell that laid heavy in the air as you walked by and the amazing cupcake like treats outside on display.  Originally I thought they were edible (and so did my fiance) but as soon as we approached I realized they weren't food and before you knew it we were being whisked inside by an award winning sales associate.  

She gave my hands a mini treatment and showed me what one of my nails could look like if I used her completely unique nail buffer all in the blink of an eye before I could even turn down her offer. (I blamed my lack of resistance on being food drunk from a heavy meal of fried calamari and slightly tipsy off of a few Long Islands).  Anywho the time soon came and it was down to business. She gave me her sale closing pitch and as I felt my glowing, soft hands and regurgitated all the reasons why I should just buy the damn lotion the grand total was about as sobering as waking up in the drunk tank on a Saturday morning in Las Vegas (nope never happened but I can only imagine).  The lotion and body scrub were $65 a piece but she could give me both for the price of one.  $65 for a damn jar of coco butter infused lotion and a body scrub.......completely outragious.  

As I walked out the store I couldn't help but laugh at the other shoppers in line willing to drop such an egregious amount of money on products offering no long term benefits what so ever.  At least that $80 vile of serum from Estee Lauder gives you youthful looking skin.

As we walked on that night I spent time searching for at home recipes for some of the most used beauty products.  Now, armed with such information won't stop me from splurging on a Sex Bomb every once in a while when I pass LUSH in Boston but it will keep me from answering the call of another well versed sales associate.  Take a look below and feast your eyes on the now declassified articles your local Body Works doesn't want you to see...


Just because summer's over and your soon to be fading tan will be fashionably covered by nubby sweaters doesn't mean you should let go of your touchably soft skin.  These easy to make bath scrubs will keep your skin bikini ready all year long...


When's the last time you took time to enjoy a good bath?  Well, making a few of these should help rekindle the flame..

And once your done why not lather on homemade lotion and spritz a customized fragrance..

The possibilities are endless when it comes to any of these easy to do recipes.  Once you've got the technique down and a good supply of basic ingredients like glycerin, shea butter or citric acid you can create everything under the sun.

Lets also remember that Christmas is literally around the corner.  I am in the process of making room for my holiday merchandise as we speak at work and last week I started receiving my ornaments.  With that horrible statement said, these DIYs would make excellent gifts.  Find some really special molds (I love these, these, these and oh yeah these are adorable), some really great packaging and your holiday shopping woes are slightly over.

Before I go I also wanted to share a really cool soap making DIY that looks so simple I may have to start with this one.


Wednesday, May 16, 2012

****Simple Chain Cage Ring DIY****


Even though the trend has been floating around for sometime now, I am still smitten with the idea of encasing one my digits in some heavy metal.  Forever shopping for a new cage ring, I came across one and instead of hopping to buy it I immediately decided to turn simple DIY.  What was the inspiration you ask??


Its from Triskaidekaphobia's most recent collection and although this baby is to die for, at $160 per ring its quite the budget breaker.  No worries though, a little chain and about 10 minute was all I needed to recreate the idea.  Read up on all the details below and don't forget to also check out the rest of the collection from Triskaidekaphobia as the pieces are pretty lust worthy.


WHAT YOU NEED:
  • 2 different chains
  • Pliers
  • Ring sizer (optional)


NOW DO THIS:
  1. Wrap chain around your finger above the knuckle making sure the fit is snug. Connect the two ends.
  2. Wrap chain around the same finger below the knuckle again making sure the fit is snug. Connect the two ends.
  3. Measure out two pieces of chain that will run along both sides of your finger.  You want to make sure that the distance is short enough so it doesn't hang to low getting in your way  but long enough so that you can bend your finger.  This may take some adjusting and readjusting until it feels comfortable.  
  4. Attach to the two rings created in steps 1 and 2.
This is so easy and looks really cool on. 


Happy DIYing and see you next post..

Sunday, May 6, 2012

****Notes To A Friend - Handmade Clay Earrings DIY****


Right about now I am enjoying an early cocktail while soaking up all the rest I can get on vacation.  Nonetheless I did want to share with you a DIY I did last weekend.  My best friend and I are huge crafters.  Although most of my expertise so to speak lies in jewelry, she is amazing in not only jewelry but crocheting.  A few years back she gave me a gorgeous gray and white crocheted blanket that is heavier than it looks, extremely efficient at keeping you warm and the pattern she used resembles little bunnies all in a row (Bunny happens to be a nickname given to me by my boyfriend that has really stuck).  Also, instead of doing the usual present exchange on birthdays and Christmas we tend to sporadically dole them out as we please.  The tradition started while we were in college.  Time was not on our side and it always seemed that around summer we were handing out last year's presents at the same time we were beginning the current year's holiday shopping so to ease up on the rush we just accepted that presents will be handed out randomly.  Now between the both of us we have bags full of chain, beads, fabric, and yarn sitting around waiting for the projects to commence and most of the time we end up handing out presents bought instead of handmade...lol.

But, getting back on track, this little idea has been itching for completion for sometime now and this weekend was pretty mild so I was able to check it off the list.  The idea stems from her love the earring assortment packages you can get at Forever 21 or H&M that offer  anywhere 6-8 pairs.  She stock piles these and who can blame her really....they're usually super adorable.

While browsing around the craft store near the clay section, I saw a spring mix of mini cookie cutters and the idea really seemed possible.  I practiced a bit and even gave her a few of my first attempts which she loved but I still wanted to do the assortment.  It was really fun and very easy and I can't wait to give them to her.

GRAB THESE:
  • Polymer clay 
  • Mini cookie cutters (a small selection should be available with the clay in your local craft store but you can find them on Etsy or Amazon)
  • Exacto 
  • Wax paper
  • Acrylic paint
  • Disposable containers for paint (I used tuna can..lol)
  • Paint brush
  • Rolling bin or round object
  • Tweezers
  • Flatback earring posts
  • E6000
  • Plain stationary 
NOW DO THIS:

  • Break off chunks of the clay and soften them up 
  • Lay out your wax paper and begin to flatten clay into a thin sheet

  •  Cut out your shapes. With my cutters the shapes proved to be ever so attached to the inside of the mold and I had to use a slim stick to gently push them out.  
  • Following the instructions on the clay packaging turn on your oven to required temperature
  • Lay wax paper onto a baking sheet and them place your shapes on the paper
  • Now bake away

  •  In about 15min my pieces were done but do check on the occassionally as it could take more or less time.  I normally judge their readiness based on how bendable the piece is...the more flexibility means a bit more time needed in the oven.  But remember to check the instructions on the clay as each brand tends to be a bit different.
  • Painting time!!! I wanted to color block my so it took quite a few coats of each color.  Plus all I had left were these colors and I opted for pastel paint.
  • It may be easier to use the tweezers to hold steady the shapes as you paint


  • Let them dry really well after each coat and if you prefer a glossy finish now would be the time to slather it on
  • All dry??  Great use the crafter's favorite adhesive, E6000, to attach the earring posts on the shapes.
  • Let the glue dry overnite for optimum results
Because packaging is everything and I am away on vacation this week, I thought it would be nice to mail the earring set to her.  You'd be surprised how pleasant it is to receive a piece of mail that isn't a bill, solicitation, or random sales flyer.  Especially with so much being handled online, why not give your local post office a bit of work.  I found these large blank cards with envelopes for a dollar at the craft store so after putting in a few holes I attached the earrings, used my signature stamp (that she actually found in a clearance bin one day for me) on the front and added a cute little message  inside.  Using an insane amount of bubble wrap to protect the package, I slipped it into a larger envelope and sent it out.


There is so much versatility with this project and because of its simplicity even a child can do it (saving the glue for adults though...E6000 is not something to play around with LOL).  With Mother's Day just around the corner I may track down a new assortment of cutters and give it a go for Mom.  I know that others use the polymer clay molds which actually come in a wider variety of shapes and objects so feel free to try those out as well.  Also I would love to try this with the translucent clay and then try another set with the gold leafing.  As I said, this is extremely versatile and open to any sort interpretation.

Do share if you make some of your own too!!!

Monday, December 19, 2011

****Xmas Rush DIY Round Up****

Okay, so at this point we are all out of valuable time when it comes to holiday gifts.  Work today was a hectic and most of the shoppers had no clue what to buy so they just bought any old thing.  I had girlfriends wondering if Nautica was an appropriate brand for their 20 something boyfriend while simultaneously asking me if a medium would work for him if he stands in at 6'2 (why they don't know sizes is beyond me). Everyone wanted to know where the pajama sets were and my sweater tables were destroyed as they frantically searched for that last size large.  Chances are most of the poor people who wind up last on the gift buying list will end up receiving duplicates of the same item and, well, that's more embarrasing for the gifters than the giftees.....how much louder can that department store brand sweater scream "I completely forgot about you and this was all they had."

Lets all avoid that embarrassing moment during the gifting hour and opt for a unique handmade gift. Because time is limited for both of us, I've scoured the web and compiled a lengthy list of amazing gift ideas for everyone on your list... Just click on the link below the picture for the steps and you're on your way


FOR THE FASHIONISTA...


FOR THE JEWELRY LOVER..


FOR THE NEW HOME (APARTMENT) OWNER...


GIFTS FOR HIM...


GIFTS FOR CHILDREN...


So I think that should about cover alot of people on your list.  Happy crafting and don't forget to check out some of my past DIYs for even more holiday gift ideas....

Related Posts Plugin for WordPress, Blogger...